
We get so used to the digital way of communicating with our friends and family, that when it’s time to send out your invitations you may find yourself a bit frazzled. Even once you get your Great Aunt Edna’s new address from your mother you’re still not quite sure how to properly address her invitation. Well fear not! Here’s a quick guide to show you how to address you wedding invitations and get them into the mail in no time flat! Continue reading “How to address your Wedding Invitations”
Tag: stamping on colored envelopes
DIY Tutorial: Embossed Envelopes
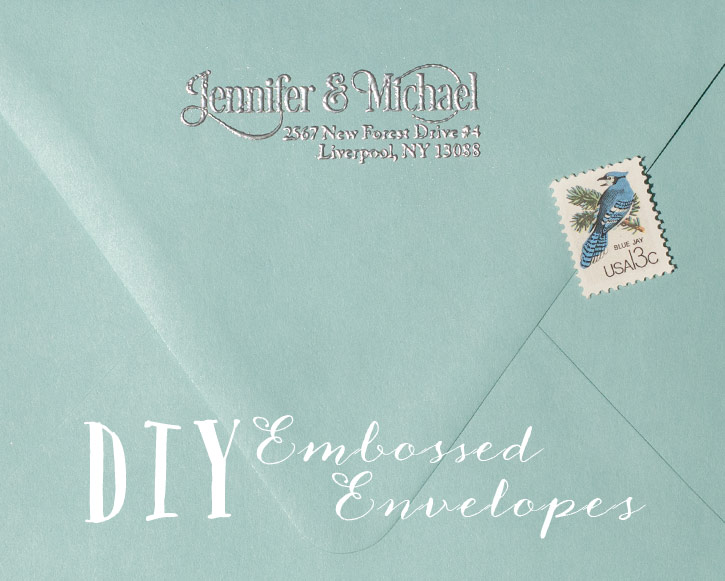
Embossing is a fun way to add a wow factor to your envelopes and notecards. This stamping technique looks beautiful on dark colored envelopes and just as impressive on a simple white notecard. Once heat set, embossing powder creates a permanent raised surface, resulting in a little extra special wow-factor for your invitations and greeting cards.
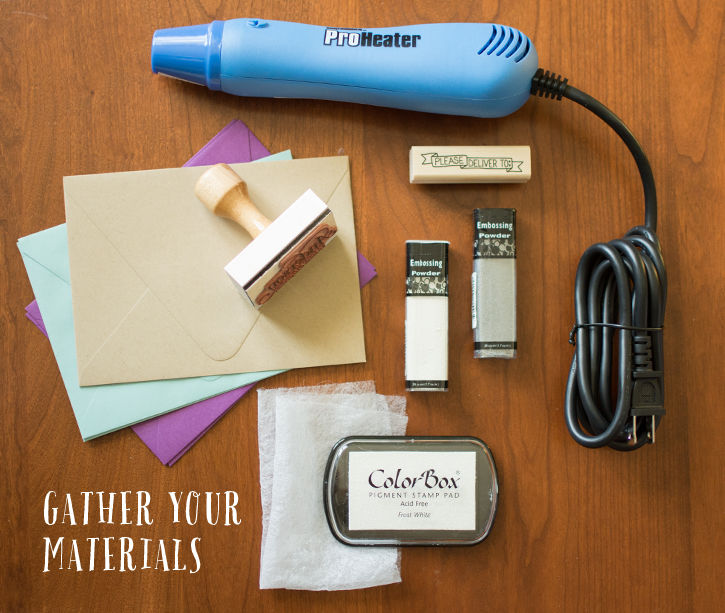
For this project you will need:
• Rubber Stamps ( I used the Serif Script Address Stamp )
• Pigment Ink Pad ( Colorbox in Frost White )
• Embossing Powder ( Colorbox embossing powder in silver )
• Envelopes or paper ( A6 Envelopes from paper source )
• A used dryer sheet or an embossing buddy
• Embossing Heat Tool
• A sheet of plain scrap paper
• Optional ( small paint brush)
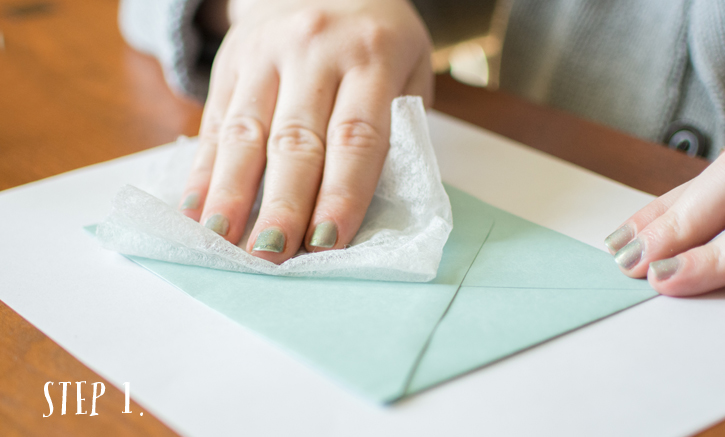
Step 1: Prepare your paper surface.
Lay your envelope or notecard on top of a plain sheet of paper ( printer paper or a old newspaper is great ). Make sure you are working on a very hard surface, when in doubt an oversized hardcover book comes in handy. Gently wipe your working surface with a used dryer sheet (or an embossing buddy) will help keep stray embossing powder from sticking to your paper in unwanted areas.

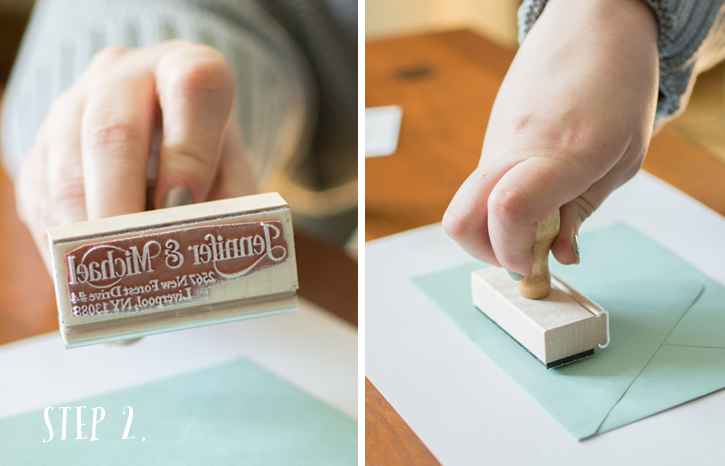
Step 2: Get ready to stamp
Have your embossing powder container open and your pigment ink pad ready to go! Gently ink your chosen rubber stamp. The stamp should have ink on the entire surface without being too heavily coated. Center your stamp where you want it and press down firmly.
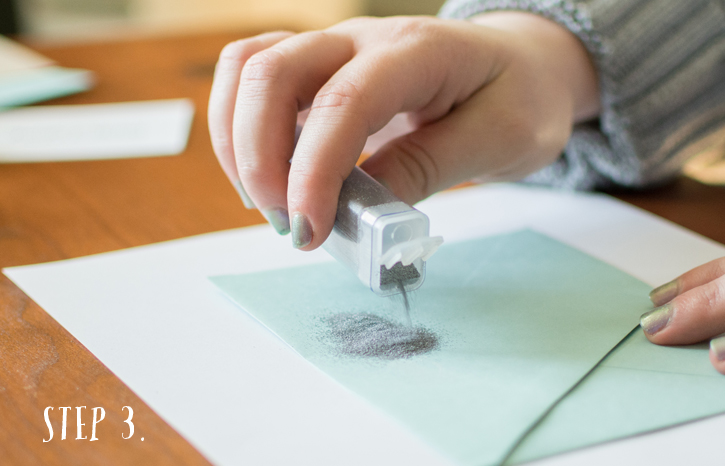
Step 3: Pour it on
Pick the stamp up off the paper without smearing your image and set it aside. Quickly pour a generous amount of your embossing powder over your newly stamped image. Don’t be shy, the excess powder can be used again, so make sure the entire image is covered. Feel free to shimmy the powder around a bit to get every last inch of your image coated.

Step 4: Shake it off
Once your image has a healthy layer of embossing powder on it, you can shake the excess powder onto the scrap paper. Don’t be afraid to give your project a little tap to shake off that last bit of powder. You can then transfer all the excess powder back into its container to use next time. If there are any stray specks of embossing powder on your paper you can gently dust them off with a small clean paint brush or your finger. Once you start the next step it will become permanent.
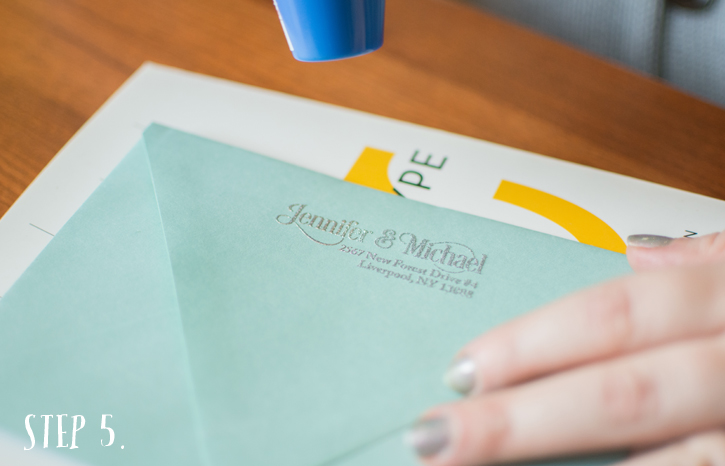
Step 5: Heat it up.
Now comes the fun part! When using the craft heat tool please keep in mind it does get very hot. I recommend setting your project on a heat resistant surface, like a granite counter or a large tile. In my case I used a thick paper back book so not to damage the wood table underneath my work.
Turn your heat tool on and wave it about 3-4 inches above paper, moving it around in a smooth back and forth motion over the image. If you hold your heat tool too close to the paper or in one spot too long the paper may warp or burn. Thicker papers have less issues with warping during the heating process. Slowly your will see the embossing powder melt into its solid form. This process normally takes about 30-45 seconds and really is magical. Once it has fully melted, turn your heat gun off and set it down on a heat resistant surface. Please be careful not to burn yourself.

Step 6: Have Fun!
Pat yourself on the back because you are amazing and so is your newly embossed creation. If your paper has a little warping, don’t panic, just place it under a hardcover book overnight and it should be flat as a pancake by morning.
Embossing is such fun and it truly is simple and quick. All you have to do is stamp, cover, shake and heat set. If you have any questions, or want to share your embossing project leave a comment below! Happy Stamping.
A great big thank you to the lovely and talented Annmarie Swift Photography for photographing this tutorial.